
this is a tutorial for how to setup popup video commands on your twitch stream. this allows chat to use a special command word that will activate a video or gif in your obs program! **there is a similar process but different coding for streamlabs obs**

to begin, you will need to download a few things. start with your streamlabs chatbot. this will be the main program for all of this to work. download whichever fits for your operating system.

next you will need to download python for the chatbot, which you can find a link on the streamlabs chatbot page. here is a link to the latest python as of right now: python 2.7.13

now download the rest of the shit. we need obsremoteparameters and obs-websocket 4.8. again, these are what are accessible as of right now in 2020. leave the obsremoteparameters in the ‘zip’ format; we will need it like that later.


begin the installs!
go through the installer process for the streamlabs chatbot first. i am not sure how this works on mac operating systems so good luck. if you are unable to do this alone, you probably shouldn’t be following this tutorial. go ahead and get/keep chatbot opened up as we will need it for the other stuff.


now you can run the installer for python. should be fairly straight forward (because it is an installer…)


if you were smart and downloaded the installer for the obs-websocket, go ahead and go through the same process yet again with the installer. if not, do not worry because there is another way.

skip this section if you used the obs-websocket installer.
if you download the ‘zip’ format of the obs-websocket 4.8, we can easily directly install it into our obs program folder. first, copy the websocket plugin application.

now find where your obs files are. it should be under either:
32-bit plugins folder = C:\Program Files (x86)\OBS\plugins
64-bit plugins folder = C:\Program Files\OBS\plugins
if you are like me and save on a different drive, go find the obs files yourself.

open up the obs-plugins file. for me it was under ‘obs-plugins’ then ’64bit’. once you are in that file, you can paste the obs-websocket file in here.

now that we have our chatbot, python, and websocket installed; we should open up our obs program to make sure our plugin is working. go to ‘tools’ in the top menu and then you should see something like ‘obswebsocket.settings.dialogtitle’ at the bottom of that menu. click it and make sure to check ‘obswebsocket.settings.authrequired’. this will allow you to make a custom password (mine is ‘ilikebutts’). then click ‘ok‘.

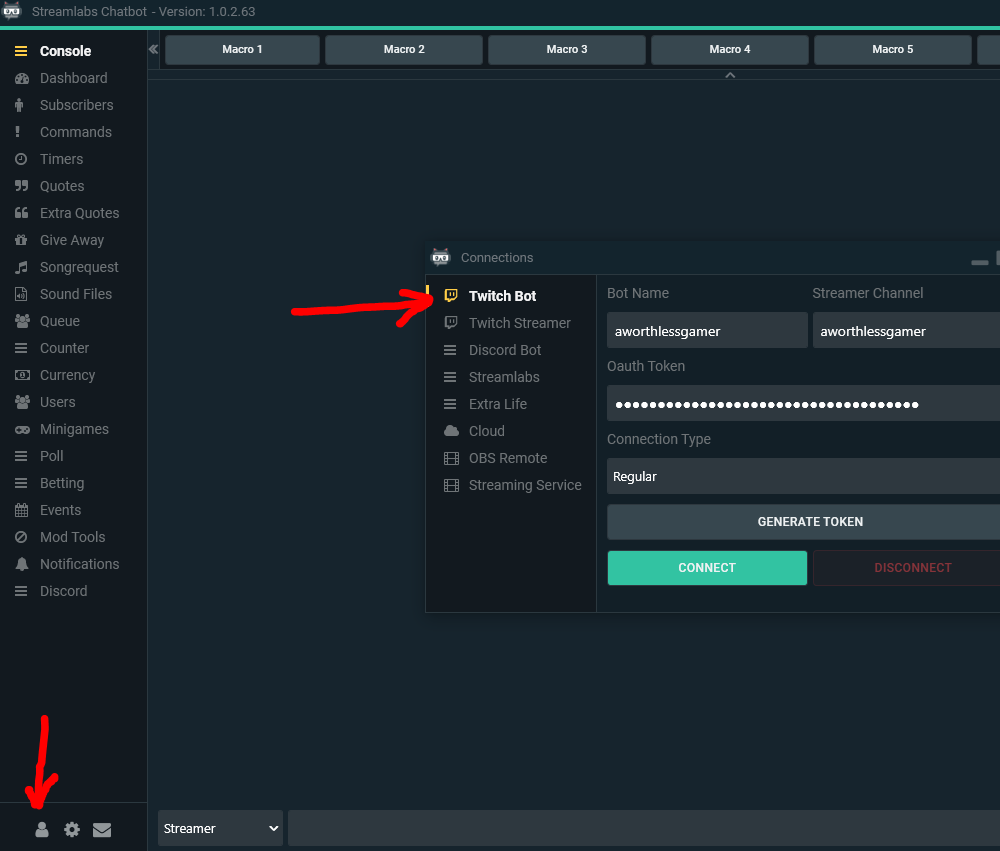
now that our websocket is set, we can open up our streamlabs chatbot. if at anytime nothing seems to be working/updating properly, just close the chatbot program and reopen it to reset. in streamlabs chatbot, click on the small profile logo at the bottom left.
this will open up a new box. in this box you want to make sure to setup ‘twitch bot’, ‘twitch streamer’, and ‘obs remote’. for the ‘twitch bot’ and ‘twitch streamer’, you will need to generate a token by clicking on the button and logging into your twitch account. once logged in (after putting in all the extra safety codes they send) click ‘connect’.

now go to ‘obs remote’ and put in the password you used in obs earlier (again, mine was ‘ilikebutts’). this is what actually connects your obs program to the chatbot (i think). the ip and port should not change, just keep the default ‘127.0.0.1 and 4444’. once done, hit that connect button.

now i would recommend going into the chatbot settings and making sure ‘auto connect on launch’ is checked. this will make it so chatbot automatically connects to your stream when it opens.

with everything connected now, you should see some new things. this includes the text in the console confirming your connection and the ‘scripts’ tab in the side menu.

click on the ‘scripts’ tab now and you will probably not see anything. let us make sure the python folder location is set. click on the settings wheel at the top right of the screen and put the python ‘Lib’ folder in the directory. if you simply just installed python like a normal person, it should look something like this: C:\Python27\Lib


now we can import our scripts. to do this, click on the ‘arrow in a square’ button at the top right. this will open up your files and you will want to find where you have your obsremoteparameters zip file downloaded. go ahead and click on the file and hit ‘open’. if the file does not show up in the scripts area, go ahead and hit the refresh button at the top right.


now we are pretty much done! lol just kidding bitch. time to keep going!
let us make some commands. go on over to the ‘commands’ tab and click the ‘+’ at the top right.


now we can create our command. i like to use exclamation points at the beginning, but you do not have to. this is where you get to be creative and make up names. to keep it simple i will make ‘!test’; this goes into the ‘command’ section. the next most important thing is the ‘response’ area. this is where you have to start understanding the plugins codes. the main one we are going to use is: $OBStimedSource(“source”, “mode”, “delay”)
source= name of the video/gif used in obs. **very important you use the same name in both programs**
mode= visibility. (onoff)
delay= length showed on screen. (number of seconds) **i usually make this the length of how long my video is**
you can also set ‘cooldowns’ for commands, that way a person or chat can’t spam the same video multiple times. i usually put the cooldown at 1 (it is in minutes) for both ‘cooldown’ and ‘user cooldown’.
my completed command is: $OBStimedSource(“test”, “onoff”, “4”)


now we have to go back to our obs program and add the media. go to the ‘sources’ location and click the ‘+’ button and then add ‘media source’. in the ‘create new’, add the same name you used as the source name in the chatbot command, mine was ‘test’.

find the location of the video you would like to use. i have found that the smaller the file size, the easier it is on your system. converting a video file to a .webm works great! here is a free video converter that allows you to convert video files into .webm files. if your video has audio, make sure to click the ‘enable audio’ at the bottom of the converter. here is a video of a dude talking more about using .webm files.


if you want to hear your media files audio through your speakers, right click on the settings wheel in the audio mixer, and go to ‘advance audio properties’. from here you can change the ‘audio monitoring’ from ‘monitor off’ to ‘monitor and output’.

with the video in place and ready to go, go ahead and click the eyeball next to the source name to hide it. if you ever need to get back to back to the video properties, just right click on the video source and click ‘properties’.
now is the moment of truth! in the streamlabs chatbot ‘console’ tab on the left side menu, you can type in the bottom. this is your twitch chat. sometimes it is best to close chatbot or obs or both to reset everything if it does not work.


WE DID IT! when the command ‘!test’ is put into the chat, the video automatically became visible for 4 seconds and then closed. now you can go and make (or steal) videos out in the wild to use on your own streams!
resource links (as of september 2020):
obs.live
streamlabs chatbot
streamlabs chatbot twitch documentation
python 2.7.13
obsremoteparameters
obs-websocket 4.8
webmconverter
here is a collection of my most recent video files i use for my stream. feel free to use them!

The game last played does not show up.
LikeLike
it only says this
Check out our friend uwumaster last seen playing uwumaster is currently offline – https://www.twitch.tv/uwumaster Give them some love, hugs, and hopefully a follow!
LikeLike
Interesting! Looks like something may have changed with nightbot commands. I am looking into it right now. Thanks for letting me know!
LikeLike
Check out our friend $(touser) last seen playing $(twitch $(touser) “{{game}}”) – $(twitch $(touser) “{{url}}”) Give them some love, hugs, and hopefully a follow!
Feel free to copy and paste this into your nightbot! This code seems to be working. Not sure why the other was showing the “currently offline”.
LikeLike
Would I be able to create a command that triggers a random video from a list or something with this? I’ve tried using trigger fyre but they have a max of 20 video and i have many more than that
LikeLike
Having an issue when trying to activate the command, the respone “$OBStimedSource(“source”, “mode”, “delay”)” pops up instead of activating the video. Everything seems to have gone well so far but I’m stumped. Any hlep would be greatly appreciated
LikeLike
if trying to use this with streamlabs there is no tool tab, do i still need websocket? what do?
LikeLike
I think this is the solution to what I’m looking for. Can all of this work with mac?
LikeLike